
Our Process
What is Design + Build
We believe DESIGN MATTERS. A truly custom and individualized architectural design is what sets NEPA Builders apart from other design + build firms. You know the way your family lives and functions is unique, and we believe the space you call home should fit that lifestyle. We want our clients to experience the value of design for generations and have a completed project that functions as well as it looks. Above all, we strive for efficiency and sustainability without sacrificing design and functionality.
Design + Build process has proven to be the fastest and most cost-effective method for delivering the best results to clients. This method allows a single firm to take responsibility of the complete project from design through construction while keeping the project focused, on time, and within budget. This is our preferred method.
Our design + build services are transparent, manageable, and clear from start to finish. Our lead designer uses his knowledge of the construction industry to ensure that your home is designed not only beautifully and functionally but in a manner that is executable and practical in our current environment. This is a game changer for maintaining budgets and timelines.
A well-planned approach to building and remodeling will provide you with long-term savings and value. Whether you’re pursuing a custom new build or a large-scale remodel, we hold true to our process to ensure the end product is consistent and as designed.
Phase 1: Pre – Design Phase
This is the first phase of starting a design-to-build project. The goal of phase 1 is to gather information about your project, see if our team is the right fit, and then make it official with a Feasibility proposal.
Timeline: Approx. 2-4 weeks
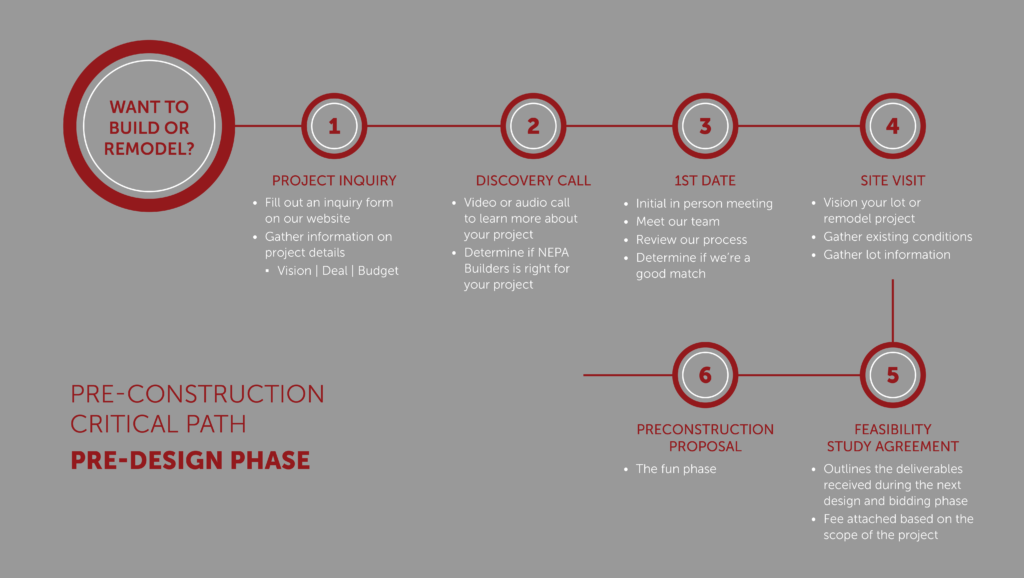
- : Project Inquiry
If you’re here, it means you have already completed step one. We know you still have plenty of questions, like how much is this going to cost, am I going to like your team, how long is this going to take, the list goes on. No fear, every single one of those questions will be answered in the following steps. But for now, start with this:- Fill out an inquiry form here, and make sure to fill it out fully. We will need to know your style and vision (Pinterest and Houzz are helpful ways to show us this), your ideal investment range, and your timeline.
- If you are pursuing a remodeling project, you can send us some photos of your current space as well.
- Get ready for a follow-up call from us within 24 to 48 business hours with what to do next.
- : Discovery Call
After receiving your inquiry email, we will schedule a follow-up Discovery Call. This is a pain-free, non-committal consult call that allows us the opportunity to hear about you and your project goals. If our team seems like it may be a good fit for your project, we move on to step 3! - : Meet up
Going into a partnership on a design-to-build process is almost like getting married for a good chunk of time. We need to make sure we are compatible! We will fill you in on our process during this first meeting, along with expectations from us and from you, payments, and contracts. How to prepare for this first meeting?- No pressure here! This first meeting is our opportunity to get a general vibe for your project and goals, answer any questions, and identify if we can help you reach those goals!
- Start getting serious about your timeline goals and ideal investment range (mentioned above). This becomes even more important in the next phase.
- If we’re a great match, you’ll leave this meeting with a crystal clear understanding of what the next steps are, we promise! You’ll have a clear task list on how to prepare for the next meeting and loads of excitement for what comes next.
- : Site visit
Pending the project, having a site visit (primarily in remodels) may be warranted prior to moving on to the next step. Measurements, identifying key areas of the home that are subject to the remodel, and exposing any potential concerns will be the focus of the site visit. - : Feasibility Study Agreement
A Feasibility Study is an excellent way to assess the viability of your project and ensure your project can be executed to your expectations and within your ideal spending range. - : Preconstruction Proposal
Once we have a good understanding of your project and its parameters, we will draft a Preconstruction proposal with a detailed list of the deliverables for the next phase of the process. Once it is signed off and a retainer is paid, we can get the process started!
Phase 2: Design Phase
Design phase = the fun phase. This is where the magic happens and the foundation is laid for your project. Initial sketches to 3D renderings followed with all of the logistics that go into creating a home.
Timeline: Approx. 1-2 months

1: Schematic Design
In the first phase of the design process, we work with you to develop the big picture. We begin with defining the general design program (rooms) of the house. This program will identify the priorities for the project and will guide us through the design process. We also focus on lot orientation to focus on how to optimize the future structure to the specific lot. We may meet on-site to identify the context, code requirements, solar orientation, and design aesthetic. Check out this blog post to learn how to best prepare for your first design meeting.
The end goal of this phase is to provide you with a series of concept drawings and images that outline the overall vision. At the end of this phase, it is common to have the following:
- Initial site visit
- Concept design development
- 3D models
- 2 follow-up client meetings
- Concept floor plan and elevations
- Conceptual site diagram
- Timeline goals
2a: Design Development
The transition from schematic design to design development happens when a client signs off on the schematic design, essentially the concept layout and 3D models of the home. We now take the initial concept and develop each area of the home’s interior and exterior. Our process takes a client through each key areas of the home’s shell and interior in order, so that we can start to create a timeline and send it off for initial bidding. This phase takes a bulk of the design phase and several owner/ designer meetings are typical during this phase to make decisions and determine a direction for the design to evolve. At the end of this phase, it is common to have the following documents:
- Site Plan: A drawing depicting the home’s location on the site and zoning regulations.
- Floor Plans: Drawings of each floor showing the size and locations of the various rooms/functions.
- Key Elevations: Drawings of appropriate sides (elevations) to convey conceptual design direction for the project.
- Roof Plan: Summary of roofing material and details such as dimensions, overhangs, drain system, slopes, and penetrations.
- Key Sections: Home cut-through drawings depicting the heights and relationships of the various floors and roofs.
- Ceiling Plan: Per area description of ceiling plans and details, including beams, casework, internal systems, etc.
- Area Analysis: A summary of the sizes of the various rooms/functions in the home.
- Selections List: An overview of the upcoming material selections that will need to be made in the next phase.
- Cabinet Layout: A per-room layout of cabinetry that will be refined and finalized in the next phase.
- Renderings or Model: 3D renderings depicting the overall look of the home.
- Preliminary Cost: An estimate of the cost of construction-based estimate on the current home design. The preceding list of drawings may still be rough in nature at the end of this phase. Their intent is primarily to determine a design direction with which to proceed into the next phase.
- Meetings: The number of meetings in this phase is dependent upon the scope of the project and the timeliness of decision-making; typically 4 meetings occur 5-7 weeks apart
2b: Finalizing the Design
The design development phase includes finalizing the size of the rooms and spaces, refining the look, selecting materials, determining the systems, and deciding on door and window types and locations. This phase may also include several owner/designer
meetings, which are critical to finalizing decisions so the detailed documentation can begin in the next phase. This is the final phase of design, and client sign-off will signify transitioning to the next phase. Changes to the overall design are still possible at the end of this phase. However, they may be subject to timeline and budget impacts.
Meetings continue in this phase and will involve builder/owner meetings and interior design meetings. Meetings typically occur 1-2 weeks apart.
Phase 3 : Documents
The construction documents phase (blueprints) involves adding a level of detail and technical information to the design documents so that we have a set of instructions to build the project as designed. It also includes selecting and finalizing interior finishes, plumbing fixtures, appliances, and decorative light fixtures. This phase is when our team of architectural designers and contractors work through the technical aspects of the project. At the end of this phase, the documents from the schematic design and design development phases should be updated in full detail. Additional documents will also be created and can vary depending on the scope of the project. A completed construction document set is highly technical and extensive and may include:
- Site Plan: A drawing depicting the home’s location on the site.
- Floor Plans: Drawings of each floor showing the size and locations of the various rooms /functions.
- Key Elevations: Drawings of appropriate home sides to convey conceptual design direction for the project.
- Key Details: Large-scale drawings of specific elements within the project
- Key Sections: Home cut-through drawings depicting the heights and relationships of the various floors and roofs.
- Outline Specification: Written description of the project’s major systems and materials
- Key Interior Elevations: Drawings depicting the relationship and material choices of the project’s interior rooms.
- Reflected Ceiling Plans: Drawings of the ceiling depicting locations of lighting, equipment, & level changes.
- Interior Schedules: A list of the type and location of interior finishes.
- Consultants’ Drawings: These may include structural, civil, and mechanical drawings.
Phase 4: Construction
This is part of design + build where the value of our time and effort into the previous six phases begins to prove its worth. The construction process doesn’t come without its share of ups and downs, but your dedication to the design process will contribute to keeping the project on time, on budget, and without regrets.
Signing of the construction contract officially marks the start of the actual build of your home. The average timeline for our custom construction projects ranges 9-12 months pending the scope of the project. The construction process follows the following order of events:
- Cost & Contract
- Engineering, Site Prep & Excavation
- Foundation & Utilities
- Building Envelope
- Systems Rough In
- Drywall
- Finish Work
- Completion
Interested in starting a project with our team? Connect with us today!